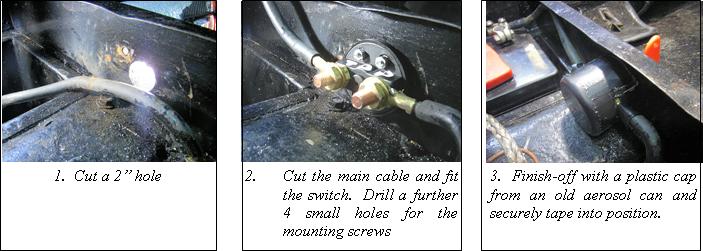
 motor
terminal. Oil can drip from the filler tube directly down onto the
electrical terminal below and, should the securing nut become loose and
a spark develop or the insulation becomes oil-soaked, the hot oil
quickly ignites. On a less dramatic point, I have always been happier
when putting Baby to bed, to know that everything electrical is
disconnected and there is no danger of a nightmare developing unseen.
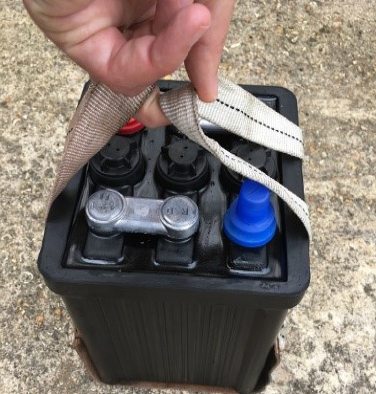
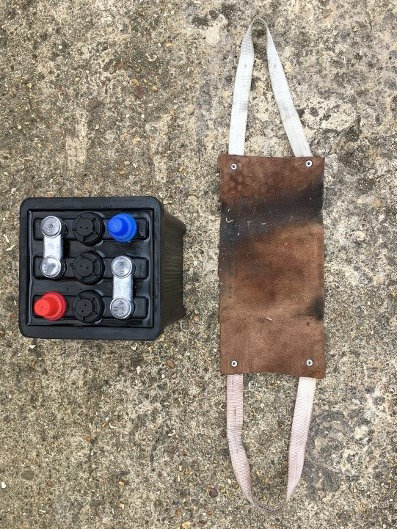
The answer: to fit an
isolator master switch
in the main power lead from the battery. There are two sorts – a simple
turn-key affair or the more sophisticated ‘Dis-Car-Net’ battery
terminal extension, both available in all high street motor shops. For
the Box, I chose the simple turn-key as the battery is underneath the
driver’s seat and to operate the terminal switch would entail lifting
the seat and the battery cover every time. The turn-key was fitted in
the front panel of the driver’s seat mounting box and can be operated
by simply reaching down and turning the key. Later cars with the
battery under the bonnet can have the turn-key fitted through the
bulkhead in line with the driver’s right knee picking up the main
battery lead on its way down to the starter motor. The only tool I
needed that might not be in everyone’s kit was a 2” metal hole-cutter
but I saw one in In Excess the other day for £1:50! One final
advantage, of course: switching off and taking the key with you is an
excellent anti-theft device.
motor
terminal. Oil can drip from the filler tube directly down onto the
electrical terminal below and, should the securing nut become loose and
a spark develop or the insulation becomes oil-soaked, the hot oil
quickly ignites. On a less dramatic point, I have always been happier
when putting Baby to bed, to know that everything electrical is
disconnected and there is no danger of a nightmare developing unseen.
The answer: to fit an
isolator master switch
in the main power lead from the battery. There are two sorts – a simple
turn-key affair or the more sophisticated ‘Dis-Car-Net’ battery
terminal extension, both available in all high street motor shops. For
the Box, I chose the simple turn-key as the battery is underneath the
driver’s seat and to operate the terminal switch would entail lifting
the seat and the battery cover every time. The turn-key was fitted in
the front panel of the driver’s seat mounting box and can be operated
by simply reaching down and turning the key. Later cars with the
battery under the bonnet can have the turn-key fitted through the
bulkhead in line with the driver’s right knee picking up the main
battery lead on its way down to the starter motor. The only tool I
needed that might not be in everyone’s kit was a 2” metal hole-cutter
but I saw one in In Excess the other day for £1:50! One final
advantage, of course: switching off and taking the key with you is an
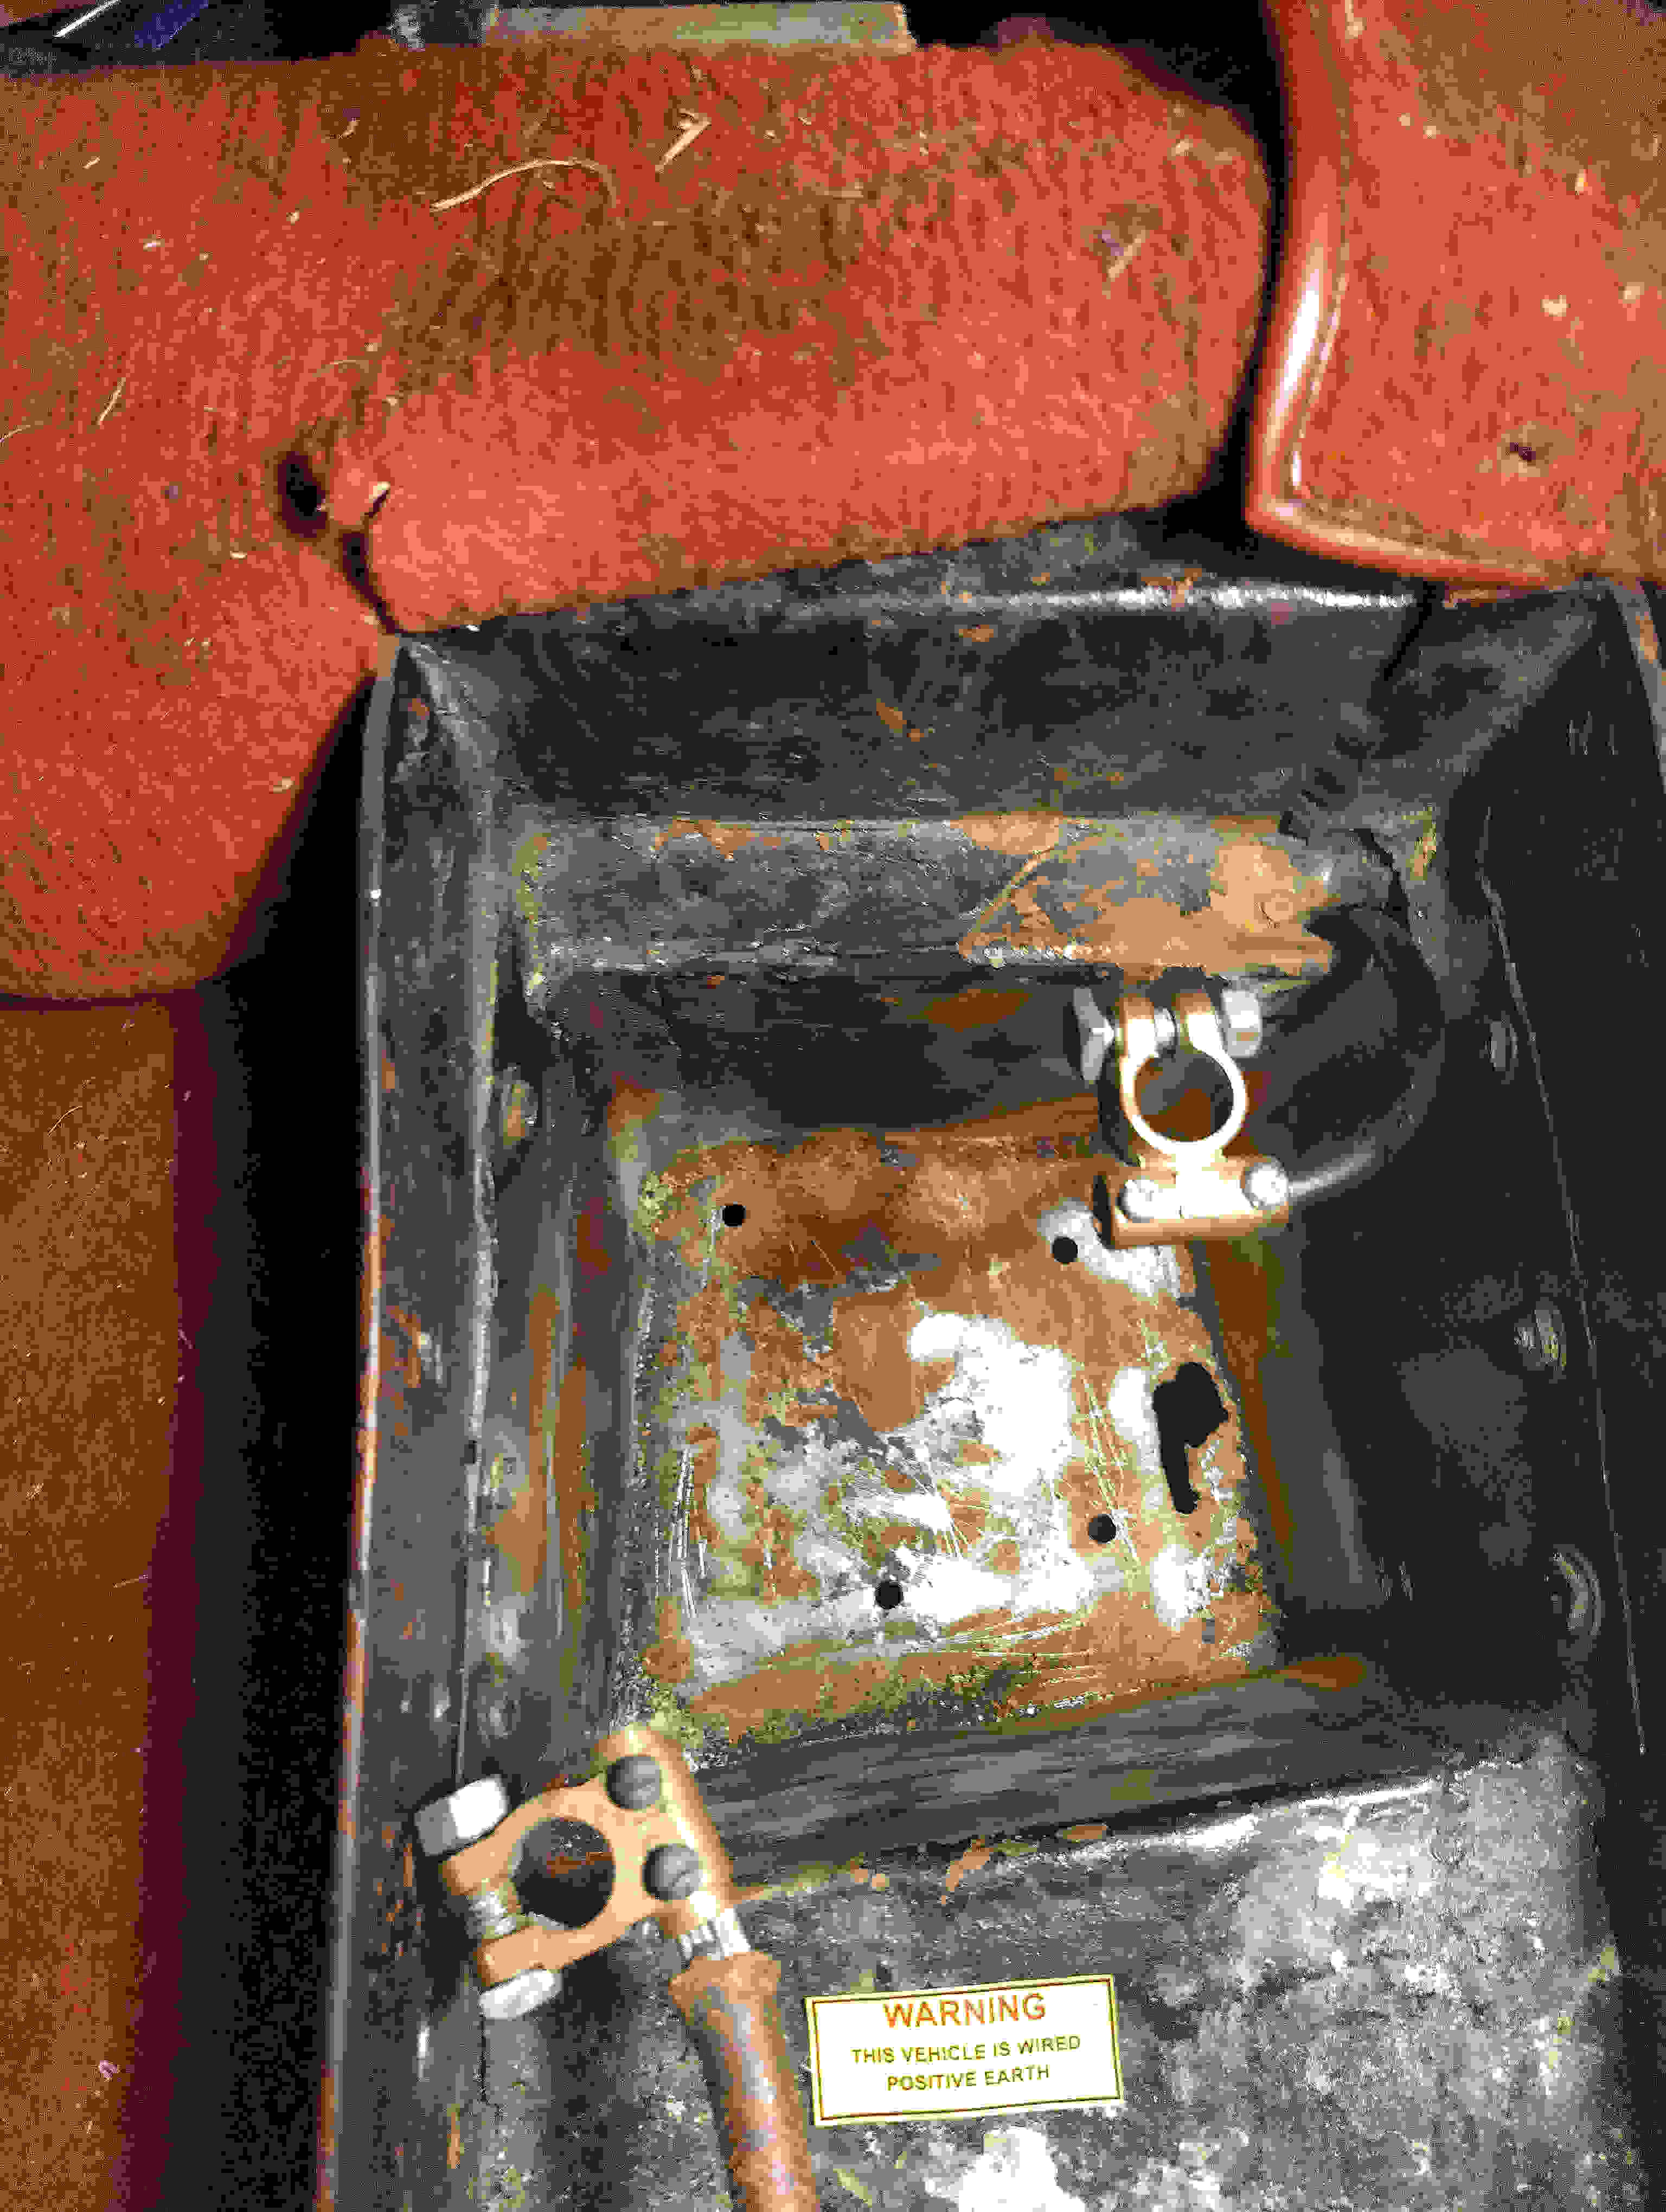
excellent anti-theft device.POOR EARTHING: An essential modification on any Austin 7 to ensure minimum voltage drop on the starter is to provide an earth strap between a clutch housing bolt and a suitable chassis point. This can be either a braided earth strap or a heavy-duty flexible cable. For battery leads I have always favoured double insulated welding cable which is both flexible and solders easily and does not go hard and fatigue over time like original cable. Never rely on crimped or clamped connectors of any type as they work loose with vibration and allow the ingress of dirt and oil to produce high resistance contacts and overheating. When I dismantled the isolator connections the one causing all the problems was the main earth contact on the inside of the battery box under the passenger seat and its fixing nut surface on the chassis side, both of which were corroded with rust causing high resistance and heat when trying to pass heavy starter current and also resulting in volts drop for other electrics like flickering led bulbs or dim tungsten bulbs. Having replaced the isolator with all its cleaned contact areas I was not disappointed with the result – the starter motor was fast and strong and the flickering LEDs had gone. Final consideration was how best to protect the areas that had been cleaned up on the chassis. There are many suggestions from Vaseline to underseal but the problem with any kind of paint is that it will creep between mating surfaces and also be difficult to remove the next time you check it. I settled for an unusual product called Red “N” Tacky which is a very sticky red lithi-um grease made by Lucas in America. Phil Whitter DA7C
STARTER MOTOR WON'T WORK: Removing the cover band I found the screw connecting the main starter brush had worked loose and the power cable to it was hanging loose! Gary Munn DA7C
RUBY BATTERY DANGER: I was carrying out a "Health Check" on a Ruby the other day and noticed rather worryingly that the master battery lead, where it exits the battery box had chafed and had been shorting on the side wall of the compartment, potentially a serious fire hazard! Obviously the rubber grommet had failed but as with many Ruby variants the battery holding clamp had long since been discarded and the battery had moved within the box, causing the issue. Take a look at yours and rig up some method of anchoring the battery and of course ensure the insulation is sound. This could of course occur on most 7's but most pre-Ruby battery boxes are a snug fit. Gary Munn DA7C
EMERGENCY REPLACEMENT DYNAMO BRUSH-SPRING: Take a good chunk of ordinary car-washing sponge – yes those big yellow jobs – just tear off a sizeable bit and jam it firmly between the dynamo casing and the brush-holder. Hey presto! a brand new brush-spring (probably cleans the commutator as well). Result – a great charge of 10amps, good enough even to hold the Chummy headlights! Ian Mason-Smith
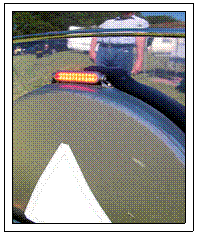 crewed firmly through
the spare wheel cover and wired-in to
the normal stop lights below. However, there is one proviso—they will only
work for 12 volt conversions, of course. They can be bought from SVC for £25
Contact Tel: 01827-67714 or ordered on-line
at
www.s-v-c.co.uk/product/small-led-high-level-brake/.
Steve Baldwin CA7C
crewed firmly through
the spare wheel cover and wired-in to
the normal stop lights below. However, there is one proviso—they will only
work for 12 volt conversions, of course. They can be bought from SVC for £25
Contact Tel: 01827-67714 or ordered on-line
at
www.s-v-c.co.uk/product/small-led-high-level-brake/.
Steve Baldwin CA7C
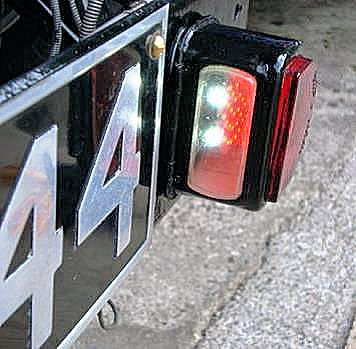 LED LIGHTS:
Ron
Hayhurst recentl
LED LIGHTS:
Ron
Hayhurst recentl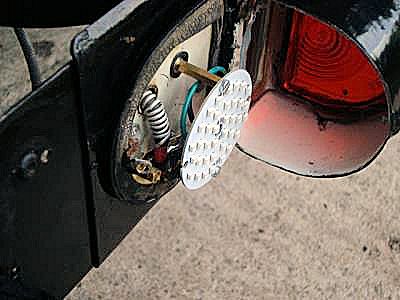 y fitted LED lights to his Box Saloon - with splendid results.
He bought them from Classic Dynamo and Regulator Conversions.
See www.dynamoregulatorconversions.com where
they show various options. From the BA7C newsletter with many thanks.
y fitted LED lights to his Box Saloon - with splendid results.
He bought them from Classic Dynamo and Regulator Conversions.
See www.dynamoregulatorconversions.com where
they show various options. From the BA7C newsletter with many thanks.
LED REAR LIGHTS QUICK SOLUTION: Head to your nearest Poundland store and buy two rear LED cycle lights at £1.00 each. Fit a small 'L' shaped bracket at each end of the rear number plate and then fix the lights to them. Two AAA batteries per light and you are in business. The lights have five different settings the most useful are a steady red light and a flashing hazard light. Jolly useful if you unfortunately break down. They will be very easy to remove in the summer, or if your car is being judged at Beaulieu as judges would not approve. Hope this tip is useful. Paul Phillimor DA7C
CHARGING THE BATTERY DANGER: Be very careful where you position a battery charger bearing in mind that it could burst into flames. The charger should be placed as far away from the battery as the leads will allow and preferably as far as possible from the car if the battery is still in the car. Also, check that the right fuse is fitted to the charger and feed it via an RCD protected outlet or RCD extension lead. Roger Ballard DA7C
ELECTRICAL STARTER CIRCUIT TESTING
1. When testing your starting circuit for voltage drop you must remember
you are looking for a potential difference throughout the circuit.
2. You will need a volt meter.
3. Check the potential difference between the two terminals of the
battery, fully charged you should expect up to 6.6 volts (2.2 volts per
cell, anything over 6 volts will be good enough.
4. Engage the starter and the voltage should not fall below 5 volts.
5. If using an analogue meter, switch it to the lowest setting, usually
1 volt.
6. Next check the potential difference between the positive battery
terminal and the starter terminal with the starter engaged. If there is
more than ½ volt you will need to narrow down where the potential
difference is.
a. Check between the terminal post and the terminal on the battery lead,
then the lead itself.
b. Between the terminal post and the next joint which could be a battery
disconnect switch across the terminals.
c. The starter button on bacon slicer starters.
d. If any of these have a potential difference of more than ½ volt you
will need to remove it and determine why.
e. Next go through the same exercise on the earth side of the battery,
earthing the system can be the cause in many cases but the potential
difference will always show where the problem exists.
f. If there is no joint that is responsible for the potential difference
but there is ½ a volt or more, make sure the cross section of the lead
is not too small as this can be a cause.
Reproduced from The Austin Seven Club of Western Australia
thanks
JAMMED STARTER MOTOR: Sometimes the starter motor can jam, normally at the most inconvenient time. Turning the starting handle will free the jammed starter motor, but switch the ignition off and make sure it is out of gear first. Douglas Alderson DA7C
BATTERY BOX ROT?
 Oxfordshire
Sevens sell a replacement or let your local mobile welder have a go.
Oxfordshire
Sevens sell a replacement or let your local mobile welder have a go.
BATTERY MAINTENANCE I seem to make frequent visits to our friends at Shield Batteries in Poole, who offer club members a good deal on their batteries. (Just mention DA7C or me). During my visits, they usually remind me of the importance of look-ing after your battery, because they see many batteries dead before the end of their optimum life. They tell me that a battery is like a human being, it needs regular feeding (i.e. charging either by the vehicle or charger when not in use) and exercise (i.e. being used), otherwise it will sulphate up and die and thus not be claimable under guarantee.
Smart chargers are a good way of maintaining your battery fully charged or at least a regular charge with a conventional charger. Better still, use your Seven.
Most of our 6-volt batteries are the old fashioned refillable type. Our cars do not have a voltage regulator like moderns, but have a summer and winter charge switch. The summer one…when working, reduces the dynamo output and helps to prevent over-charging. Over-charging causes the battery fluid to “boil” and emits that rotten egg smell. It is very important with a Seven to regularly check the fluid level in the cells, topping up with distilled water so that the liquid is above the level of the plates. If a battery runs dry, it will die. Keep your terminals clean and tight, cover them with Vaseline to pre-vent corrosion. Ensure your battery is securely fixed. Finally consider fitting a battery master switch, which is so useful in the event of an electrical fire (see my article last month starter switch) and is a useful anti-theft device.
Gary Munn DA7C
BUYING A BATTERY - The Options
(May '24): There are two types of 6-volt batteries - those with
the traditional exposed cell connectors, usually lead, and those in a
hard plastic case with a modern plastic strip closing the filler-holes
and no exposed connectors. This article is looking at 6-volt batteries
having no exposed connectors for safety’s sake that will fit the battery
box of an A7. 421 is the UK code for these batteries which describes the
size and terminal layout regardless of whether or not it has exposed
connectors. The typical size of a 421 is H210 L170 W160 but there can be
slight variations in all these sizes so it is essential to check the
quoted size of the one you have decided to buy against the one you are
replacing and where you are fitting it.
Locally, for comparison, Shield Batteries in Poole retail a hard rubber
cased, traditional vintage battery but with exposed cell connectors with
a capacity of 58 Ah, 270 CCA and 1 year warranty.
Exide "Vintage Marine and Multifit" UK 421, which is the important
reference for us, has a plastic case, a capacity of 80Ah and 600 CCA
cold cranking amps with no exposed connectors and the Bournemouth
Battery Centre retails this at £90.
Online, the EU 80-6 Exide Marine Leisure Vintage Battery 421 from
Tanya
in North Wales retails at £69.12 with £42.90 pallet delivery (£112.02),
warranty not stated; a Jenox 6-volt 421 (EU 80-6) from
Alpha Batteries retails at £99.98 delivered, with a 2-year warranty;
an MG Owners Club 421,
badged “Q Parts”, sells for about £106 including carriage but has a
lengthy signing-in process to create an account. Yuasa 421 Classic in a
hard rubber case, available from many
Motobitz stores, retails at £144.99 but this battery has a lower
56Ah and 250 CCA, warranty not stated.
In simple terms, if you have chosen to buy a covered cell connector
battery for safety reasons then the Exide Vintage, Jenox or MGB would
all seem to originate in the Polish Jenox factory as they all look
identical. They have a stated capacity of 80Ah and a cold cranking of
600 Amps and retail around £100 delivered with a 2-year warranty but I
have not investigated how you implement the warranty! Phil
Whitter DA7C.
BUYING A 6V BATTERY – PERSONAL RECOMMENDATION: Following Phil Whitter’s excellent research on which 6v batteries are available, I went for the Exide Vintage Marine and Leisure 421 6v with its covered connectors. Local suppliers are The Bournemouth Battery Centre at 18 Kinson Rd, Bournemouth BH10 4AJ. The listed price was £90 but I have persuaded them to give DA7C members a small discount and was charged only £80. As the batteries need pre-charging, give them a call two or three days beforehand on 01202-528153 and to arrange when to collect. When I arrived, their little car park to the rear of the shop was full but there is an Aldi in the next street where I parked and my battery was waiting for me to pick up in the shop. One word of warning – the battery is incredibly heavy and, luckily, I had taken a bucket to help carry it back to the car. David Whetton DA7C