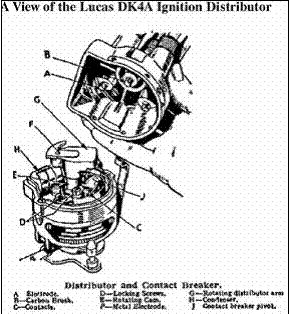
The Austin Seven Auto-Advance distributor
From the Austin Seven Owners Club’s ‘Electrical Correspondent’ with many thanks
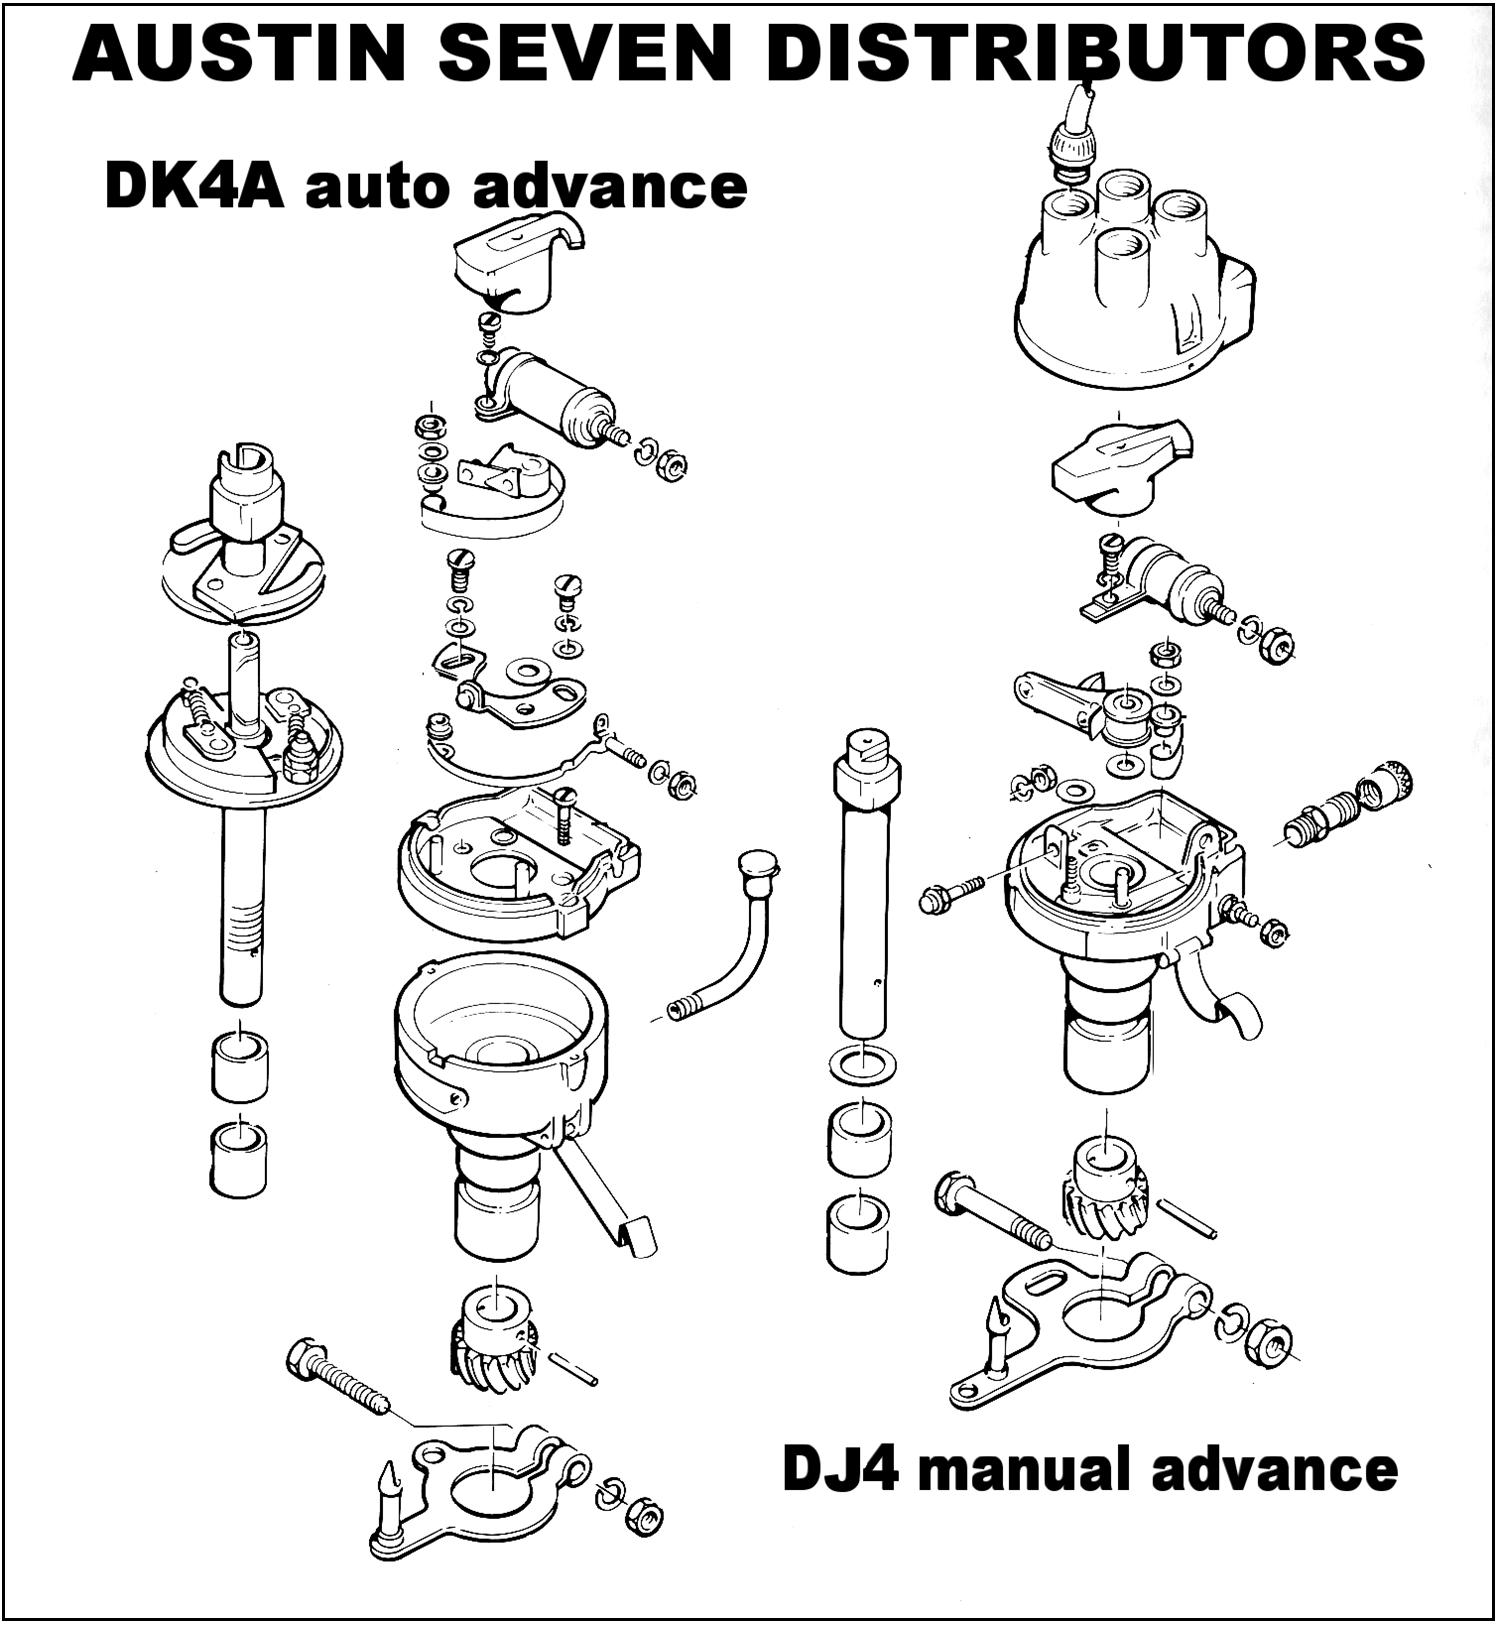
Up until the end of 1928, Austin Seven ignition was by magneto. But by the time Santa had arrived in 1928, coil ignition was definitely established, using predominantly a CAV/Lucas type DS4 manual advance distributor and associated coil equipment. For a fairly short period “ML” brand distributors and coils were also used. It is interesting to note that, while CAV, ML and Lucas were all trading in their own rights, by the end of the vintage years, all these brands were in fact part of the Lucas empire and a bit of badge engineering was well and truly alive, even then.
The distributor was driven through gears at the end of the
dynamo armature, a feature that was to remain with the Austin Seven right up
till the end of production in 1939. By sometime in 1931/32 the original DS4
distributor had been replaced by the more modern Lucas DJ4, which, although
still a manual advance unit, was beginning to look more like the unit that would
eventually replace it, and, in fact the distributor cap for both this
distributor and the later DK4A were interchangeable.
AUTOMATIC IGNITION ADVANCE
With the advent of the “Ruby” and associated models, manual advance control gave way to “Automatic Mechanical Advance” and the DK4A distributor, then at the forefront of Lucas distributor technology, became a standard fitting in the Austin Seven. The original Advance characteristics were not very adventurous, a mere three degrees of mechanical advance being provided. This conservative rating was soon changed to eight degrees, and this remained the specification until the end of production. It is interesting to note that Lucas specified the eight-degree distributor for the entire 1934 to 1939 Austin Seven range, in its post war B90 Service Spares system. In this article we will look at some of the intricacies of the DK4A distributor, and just how this vital and quite stressed component can be maintained in good fettle. It must be remembered that these distributors contain fragile Bakelite materials that are easily damaged. The quality of these early parts however is beyond reproach, and can in fact be far superior to many modern equivalents. With a little care and commonsense however, these amazingly rugged contrivances can be put in good order, and given a little care and attention from time to time are quite capable of giving sterling service.
ROTATION SPEED OF DISTRIBUTOR
The distributor is driven from the camshaft and rotates at half the crankshaft speed. That is to say the distributor rotor makes one full revolution for every two revolutions of the crankshaft. This is an important consideration when dealing with aspects of timing and adjustment.
WHAT GOES WRONG?
As our cars get older, it is inevitable that the matter of
ignition problems can and do arise. There is also little doubt that one of the
more obscure areas of problems and difficulty is that of the advance mechanism.
In days of yore, when the parts were readily available, it was a normal practice
to replace ignition
distributors when the internal parts, other than the normal consumable service
items like contact breaker points, rotor, cap and condenser failed. Lucas ran a
highly successful, and reliable, “B90” exchange system from somewhere about 1935
onwards. There was always the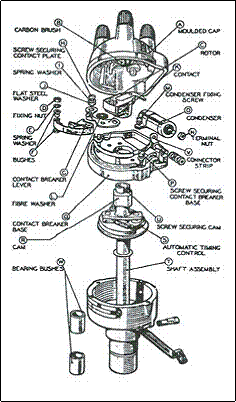 alternative of having the unit rebuilt by a local
specialist. Today, with the gradual demise of distributor ignition in favour of
sophisticated electronics, these specialists are fewer and farther between and
there just aren’t many specialists available today who would even know what a
“Distributor Graph” machine is, let alone be able to drive one. On an elderly
distributor the advance mechanism is usually suspect as it is subject to a great
deal of heat and high frequency vibration, not to mention oil dirt and grit, or
even more worrying, the ham fisted endeavours of the “Hammer Chewer Mechanic”
(and some supposedly not so amateur artisans!) to facilitate a fix!
alternative of having the unit rebuilt by a local
specialist. Today, with the gradual demise of distributor ignition in favour of
sophisticated electronics, these specialists are fewer and farther between and
there just aren’t many specialists available today who would even know what a
“Distributor Graph” machine is, let alone be able to drive one. On an elderly
distributor the advance mechanism is usually suspect as it is subject to a great
deal of heat and high frequency vibration, not to mention oil dirt and grit, or
even more worrying, the ham fisted endeavours of the “Hammer Chewer Mechanic”
(and some supposedly not so amateur artisans!) to facilitate a fix!
The requirements of an ignition distributor are very demanding and the least little wear and imperfection can cause odd behaviour and can result in severe loss of power, overheating and can even cause serious mechanical damage to the engine. The installation of a properly adjusted and mechanically sound distributor, with the electrical components all in good order can return your car to crisp, reliable performance. So, just what usually goes wrong?
MECHANICAL ADVANCE COMPONENTS
The problem, apart from normal service attention to the contact breaker points, is usually in the area of the mechanical advance components, tucked down out of the way in the bowels of the distributor. Here, seizing up of the weights and/or the cam on the shaft can often be unveiled, either because of rust and or gunged up lubricants or else there will be wear on the various pivot points and maybe rigor mortis will have set in with a vengeance in the springs’ department. Once in a great while one of the two mechanical advance flyweight return springs break. On older vehicles, and let’s face it, the last Austin Seven was built well over 60 years ago the springs definitely deteriorate with age. Clumsy disassembly and replacement of the springs also can account for a fair share of problems in this area. Springs are harder to find than rocking horse manure and, in theory at least, must be carefully matched and adjusted, using specialist equipment, like a Distributor Graph machine, to ensure that the advance curve of the distributor is within specifications.
On high performance vehicles that is all very well, but on less demanding service in an Austin 7, the niceties of an exact advance curve are somewhat less important than ensuring that the mechanical advance components snap back to rest after operation and that the rotating cam is not allowed to flop aimlessly about all over the place with the “rest” position being determined more by the chance effects of friction due to grime and wear, rather than the precise acrobatics intended by the designer.
The holes in the action plate and, indeed, the stop pegs in the weights can also wear. This will give rise usually to a greater maximum advance than the designers intended, which may not be a totally serious situation if the wear is not too excessive. A good engineering shop should be able to weld up the action plate “holes” if they are worn and then accurately re-drill them.
Apart from the very original DK4A distributors fitted between1934 and late 1935 which had a 3°action plate, all other DK4A distributors fitted to the A7 were fitted with 8° action plates. The amount of advance is, of course, set by the size of the holes drilled in the plate. I really do believe that the earlier 3° distributors were found to be able to be radically improved upon by the later specification, which view seems to be supported by the fact that Lucas later specified the 8° type as a service item to replace the earlier type. So, at the risk of being labelled a heretic, I would not hesitate to upgrade any action plate to the later specification when repairs are undertaken. In fact, given the increased octane ratings of present day fuels vis-à-vis those available in the 1930s, I really do think that a bit more than the nominal 8°advance could be usefully tolerated today. If you are running a car with a worn action plate, you are most likely already achieving that anyway. But I wouldn’t like to urge anyone into bad habits. A distributor, which jams due to a weight coming adrift, can be an unforgettable experience, particularly if it happens “at full song” on the open road, and can be a very costly exercise to remedy; so “a stitch in time saves nine” is a very useful adage in this department.
worn distributor shaft bushings
The main reason to replace a distributor is because of worn distributor shaft bushings. Slack bushes allow side play on the distributor shaft and will have drastic consequences on the point’s gap. When the bushing really wears out the rotor will fly out of its track and hit the distributor cap contacts. This can, and eventually will, break the distributor cap. The bushings can be replaced but beware, you should use “Oilite” or similar porous, oil retaining bush material, or else they won’t last long. Oilite and similar bushings can be adversely affected by reaming, so there is another little worry that has to be overcome. They can be machined, but sharp clean-cutting tooling is required and any “burnishing” type of action is a no-no. If you are competent enough to replace your own bushes, then you don’t really need me to tell you how to. One difficulty is that the shaft has a nominal diameter of 0.490”, which is hardly a standard size. I think if I had less than a well-equipped workshop, I would be inclined to seek the services of the local engineer to remove the old bushes and make up some nice new replacements and refit them. Having said that, the bushes wear remarkably well, particularly if they are properly lubricated from time to time and I have just put a 1936 distributor back together, complete with original bushes and negligible shaft side play.
It is very difficult to provide arbitrary wear limits in respect to sideways play in the distributor shaft. Really, though, any discernible sideways movement of the shaft in its bearings is a source of some concern and really needs to be attended to. The choices for replacing or repairing are about time and costs and, of course, the availability of spares/replacements.
A BIT MORE ABOUT ADVANCE SPRINGS.
In the DK4A distributor, fitted with heavy “leaden” weights,
the springs were relatively heavy items, provided as a matched pair, and which
gave a more or less “straight line” progression from full retard to full advance
as the speed of the engine increased, and until the total advance was checked by
the stops in the action plate. As distributors evolved, and we are now moving
outside the Austin 7 era, a later development was the fitment of two dissimilar
springs, the lighter one of which allowed early advance to take place at
relatively low engine revs, and then the action of the heavier spring reduced
the rate of advance at a particular higher engine speed. This gave the effect of
a “kink” in the advance curve, in an effort to optimise the particular advance
“settings” at mid range engine speeds. Still later, the heavier of the two
springs was so arranged as to be only “loosely” affixed at rest and lower engine
speeds. This was for similar advance curve “trimming” purposes. I mention this
here really as background information, as I have known precious distributor
springs to be thrown away because a well meaning owner has found either
physically dissimilar springs fitted, or else one “loose” and has made the
mistaken decision that something was wrong.
BASIC ROUTINE DISTRIBUTOR SERVICING
The importance of a sound ignition system to the running of a car cannot be overstressed. The heart of the ignition system is the distributor. The Lucas distributor is as reliable as any, provided it is given proper maintenance. This is actually quite simple and will reward the owner with increased distributor life and enhanced reliability, performance and economy. But you must remember that this sort of equipment was developed and reached its peak in an era when “Preventative Maintenance” was world’s best practice. This means that the equipment cannot just be “installed and left.” Proper routine maintenance servicing is required, and, if properly performed, can guarantee long and problem free operation.
To service the unit, one needs only a small oil can, a tube of Bosch or similar point lube (Lucas recommended Shell Retinax A grease in very small quantities), a set of suitable feeler gauges and a thin-blade screwdriver. Removal of the unit and major service require, in addition, suitable spanners for the removal of the unit from the car and a good screwdriver. Naturally you will need materials for cleaning both the unit and probably your hands. For what it’s worth, you will find that the screws used are “BA” threads’.
LUBRICATION
Make sure you sparingly lubricate all the obvious places. Three in One oil works fine. I like colloidal graphite but it is hard to get nowadays, and there is a Rocal product, which comes highly recommended for such purposes. A minute dab of grease on the cam is also required. A MINUTE DAB! Lubricate sparingly!! A piece of thin wire (e.g. “bell-wire”) dipped in oil and used to apply a couple of drops is all that is required at each lubricating point. Little and often is the best rule.
EVEN A BIT MORE ABOUT SPRINGS
As indicated above, if the springs are sad, they will need replacing. At the risk of having the Lucas Design Engineers turn in their graves, can I say that, for our purposes, the main thing we need to achieve out of the advance mechanism is for the distributor to position itself at full retard for starting and then to arrange itself at fairly close to full advance once the engine is much above 1000rpm or so. Those of you who drive a car fitted with manual advance will readily be able to comprehend the lack of precision involved. So, if your springs have really had it, a trip along to a good spring maker with a sample spring should be able to result in a replacement set being able to be made, although on a one off basis they may come a bit expensive. I have never been able to understand why one or another of the clubs, or one of the specialist suppliers have never commissioned a small supply of distributor springs, and for that matter distributor weights as well. Drawings are available, and it would not seem to be an impossible task, and would certainly be the means of ensuring ongoing reliability for many years to come. What I have found is that the springs out of the Distributor fitted to the Series 2 Morris Minor Distributor can be pressed into service quite effectively in an Austin Seven. I have a Distributor Graphing Machine and have actually tested the curve obtained with these springs and have found them well within A7 specs.
DISTRIBUTOR CAMS AND CONTACT BREAKER “GAP”
Distributor Cams are also of some interest. Basically there are three types. The original fitment, which has a relatively low “lift”, on which the contact breaker operates. Then, shortly after WW2, Lucas introduced a cam that had a quite sharp “opening lift” and a relatively extended “closing.” Then in the early 1950s the so-called “High Lift” cam was introduced. Contact breaker gap for the original type (sometimes termed as “synchronous cam”) is specified as 0.012” in service, with 0.014” as an initial setting to allow for cam wear as the heel of the operating heel on the Contact Breaker “beds in.” I would never use the intermediate so called “asynchronous” cam. The later “high lift” cam can be fitted to DK4A distributors and many B90 Service replacements had this cam fitted as standard. With this cam the correct points gap is specified as 0.014” in service, with 0.016” as initial setting. New Contact Breakers should always have the protective coating thoroughly cleaned away from the point faces, using a suitable solvent as required.
DISTRIBUTOR DRIVE GEAR New Distributor Drive Gears are still available. Common sense is the discerning factor here, and while some wear can be tolerated, it would be false economy not to replace a badly worn drive gear.
FINAL MATTERS Naturally, the condition of Caps, Rotor, Spark Plug Leads and Condenser will all have to be properly assessed. Cleanliness here is vital. Some wear on the rotor and terminals within the cap can be tolerated. One thing is certain and that is that the original parts were made using materials with highest quality insulating properties, which is more than can be said for some modern replacements, so old parts are worth preserving if possible. A visual inspection for tracking marks on the inside and outside of the cap and rotor may be illuminating.
Another useful ploy is to fire up the engine after dark and lift the bonnet. A fireworks display under the bonnet may well reveal shortcomings in spark plug lead and other insulation! The connecting link, which runs from the contact breaker terminal to the Condenser/LT Terminal, has been known to crack and break, particularly near the condenser. This can be the cause of an annoying ignition “miss” and can be difficult to find. Easily repaired though once you are aware of it. Use a wire strap, nicely soldered, if you can’t find a replacement. On the subject of Condensers, these are a vital component of the ignition system. They very seldom fail, but if they do, and you can’t get an original component, a modern job will usually do, and it is often possible to use the original mounting ring. If you can’t then an externally mounted condenser, attached to the LT terminal, even if lacking elegance, will get you home. A properly functioning and tuned ignition system, with a properly operating automatic advance system, can dramatically transform the performance of your car. You owe it to your car and yourself to see what you can do with yours. As you can see from the above, it is definitely not rocket science!!!
Andy DeLuvian Your Colonial Correspondent
With many thanks to the A7OC