AN EXHAUSTING JOB
Replacing the
exhaust system on a LWB Box
In the months leading up to the club
holiday in Normandy I had been repeatedly patching up my failing, and rather
elderly, exhaust system and, inevitably, on coming home it had collapsed
entirely. So, in a fit of bright
endeavour, “I’m not putting up with this b****y thing anymore”, I cut o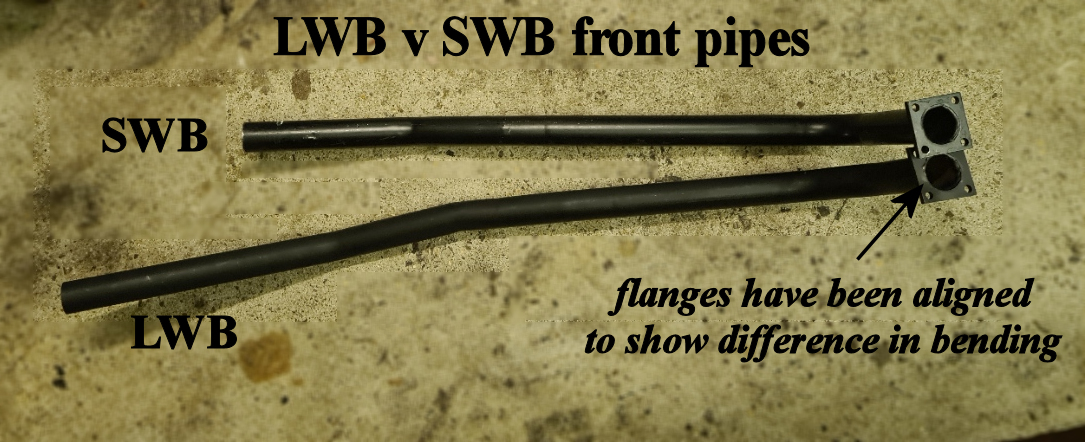 ut
the old system to be replaced by a nice new one.
WRONG! First check your supplier (Seven Workshop).
“Sorry, we’re out of stock of LWB silencers and not expecting new
supplies for 2 months!” And that’s the way the old girl stood on her axle stands
for 2 months, not going anywhere ‘cos daddy had chopped her exhaust into bits.
Lesson learned chaps. But it gave me time to attend to some other minor jobs
which had also suffered over the 250-mile journey over the vicious French
Gendarmes Dormir.
ut
the old system to be replaced by a nice new one.
WRONG! First check your supplier (Seven Workshop).
“Sorry, we’re out of stock of LWB silencers and not expecting new
supplies for 2 months!” And that’s the way the old girl stood on her axle stands
for 2 months, not going anywhere ‘cos daddy had chopped her exhaust into bits.
Lesson learned chaps. But it gave me time to attend to some other minor jobs
which had also suffered over the 250-mile journey over the vicious French
Gendarmes Dormir.
When it arrived with much anticipation
2 months later, they had sent the wrong front pipe (i.e. a SWB one).
But how often have you replaced the exhaust system on your Seven? Me?
I can’t remember when, if ever, so one front pipe looks exactly the same
as another plus the absolute confidence that it would be the right one as I had
ordered. I spent a whole day under
the car trying to make the wrong one fit until a light started to dawn and a
phone call to Gary and Glyn possibly confirmed the mistake.
Finally, being a great believer in ‘ocular evidence’, I took the
offending part over to Roger’s where he has two Sevens – one SWB and one LWB and
the shape was then as clear as clear as to which one I had in hand. A bit of a
fuss, but it gave me the confidence to tackle the Seven Workshop.
Good to their word, a correct one was shipped first class and work could
start in earnest the next day and, of course, everything ‘clicked’ into place as
it oughta.
So here’s my DIY guide to fitting a
new exhaust system to a LWB Box.
·
Make sure you’ve got the right parts (see photo),
new gasket and some exhaust paste.
·
I always cover my front pipe with an exhaust
bandage to help keep th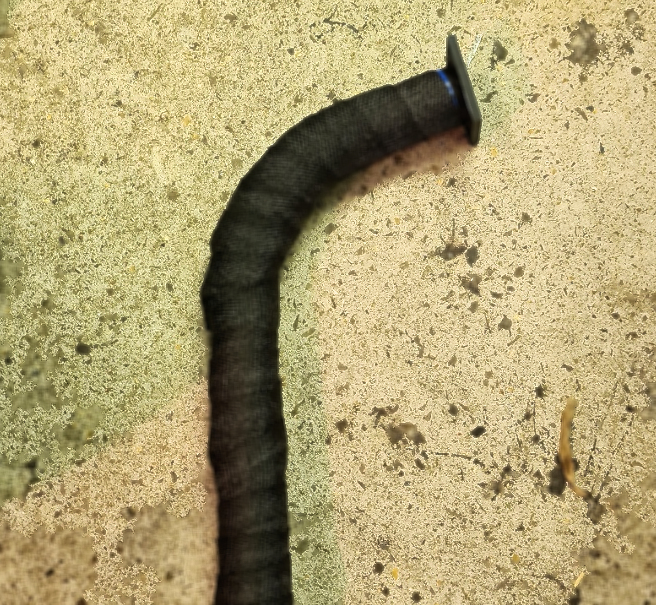 e
heat away from the fuel system and also some soundproofing.
Exhaust Header Wrap Kit, 5M Car Exhaust Wrap, Black Exhaust Pipe
Insulation Cloth, Fiberglass Exhaust Shield Wrap Roll with Stainless
Ties/Disposable Gloves, Exhaust Heat Shield at £7.69 from Amazon is just the
right length. You soak it for about
5 minutes then wrap it tightly round the front pipe, clearly best done outside
the car, before you start.
e
heat away from the fuel system and also some soundproofing.
Exhaust Header Wrap Kit, 5M Car Exhaust Wrap, Black Exhaust Pipe
Insulation Cloth, Fiberglass Exhaust Shield Wrap Roll with Stainless
Ties/Disposable Gloves, Exhaust Heat Shield at £7.69 from Amazon is just the
right length. You soak it for about
5 minutes then wrap it tightly round the front pipe, clearly best done outside
the car, before you start.
·
Before you start assembly, the front silencer
clamp (the bigger of the two) sent by Seven Workshop is slightly too small and
some relieving with a file is needed, best done, of course, on the bench rather
under the car. Also, on the Seven
Workshop silencer, there are no slots cut into the short rear end exit pipe for
compressing onto the tail pipe so some work is needed there.
·
Start with the silencer. Everything else fits
into it and the front pipe and the tail pipe come too long so they can be
adjusted to fit by shortening slightly.
You will need to support the silencer with an axle stand towards the
front as it’s v heavy and hang it on its bracket at its rear.
·
Present the front pipe from below as it has to be
on top of the radius arm and secure it loosely to the exhaust flange with a
couple of ¼” bolts to keep it in place.
·
Align the front pipe alongside the end of the
silencer and mark off where to cut off a piece from the end by using a small set
square on the end of the silencer body (see photo).
Ther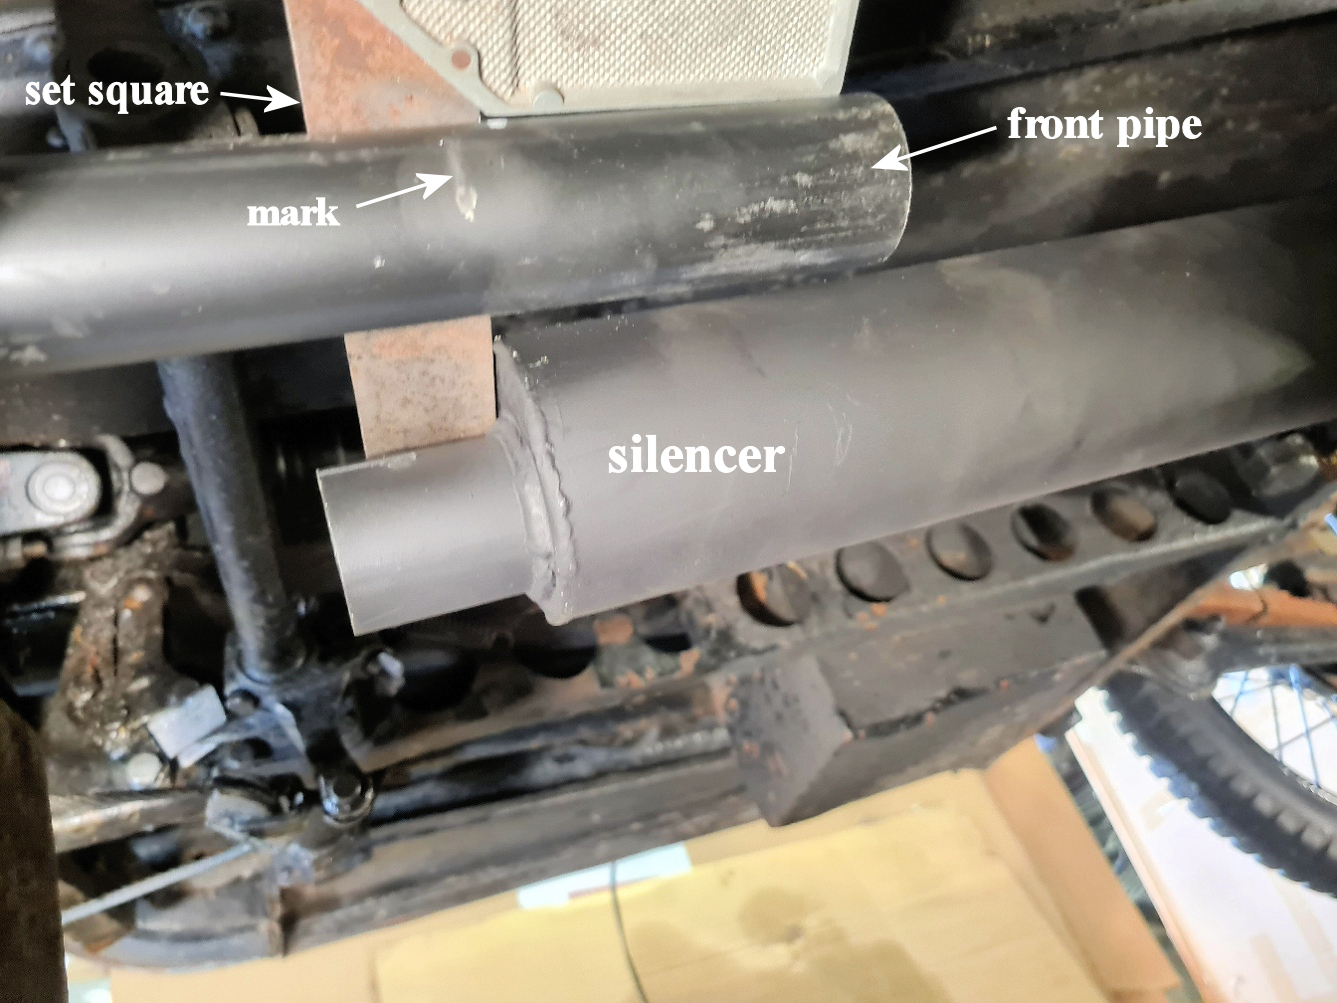 e
is a ridge inside the silencer’s small inlet tube so you can’t push the front
pipe in too far and you can feel the positive stop.
e
is a ridge inside the silencer’s small inlet tube so you can’t push the front
pipe in too far and you can feel the positive stop.
·
Repeat for rear pipe but be aware that the rear
pipe isn’t symmetrical front to back – on closer inspection the longer end with
two distinct bends goes into the silencer and the end with a short inward kink
is the outer end. I found the easiest
way to present the rear pipe to the silencer was over the nearside rear hub.
When looking at clearances of the end pipe it is easier to image that, on the
road, the underside of the body stays still and it’s the rear axle that goes up
and down so the gap between the tail pipe and the fuel tank doesn’t change but
the gap between the tail pipe and the rear axle needs to be as great as
possible. The top of the curve of the tail pipe will be very near a spring
hanger but that, too, won’t move. I
have made a bracket from the floor pan just ahead of the rear axle to secure the
tail pipe at its highest point just to steady it side to side and another,
downward bracket from the luggage rack to stop it shaking around.
·
When everything is ready to go, dismantle the
whole system, spray with high-temperature spray paint, check the fitting of the
brackets (not forgetting to thread them onto the pipes) and apply exhaust paste
to the joints.
·
Final assembly:
o
Attach the front pipe firmly to the flange,
supporting the far end with an axle stand.
o
Thread on the silencer and attach its bracket
loosely to the underside of the car.
o
Thread on the tail pipe and adjust for height,
tightening any brackets.
o
Adjust and tighten the silencer’s bracket to the
right height.
o
Tighten clamps and check the nuts on the flange.
o
It might have just been my car but, on final
assembly, the front pipe was rubbing on the edge of the drip-channel that goes
along the chassis underneath the carb and a bit of serious bending of the tray
was needed.
o
Run the engine lightly so as not to blow out the
exhaust paste and check for any leaks.
(I had cut one of the slots in the rear pipe of the silencer too deeply
and needed to GunGum it up!)
o
Job done!!
David Whetton DA7C
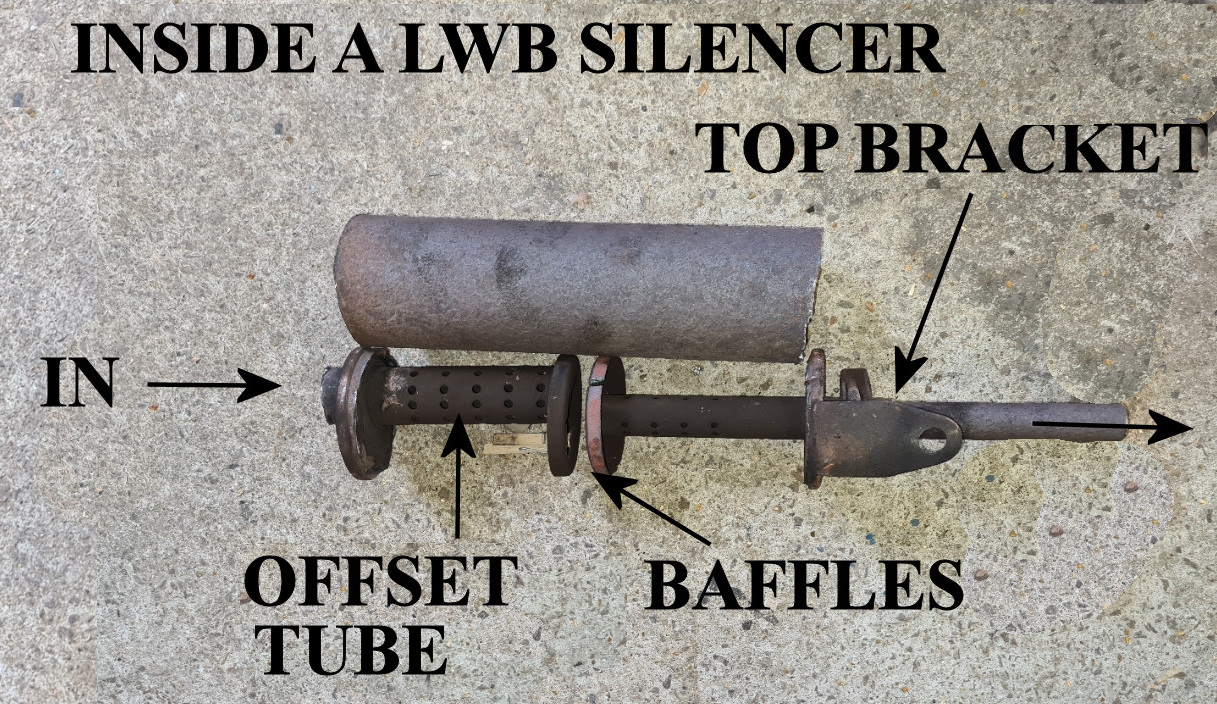
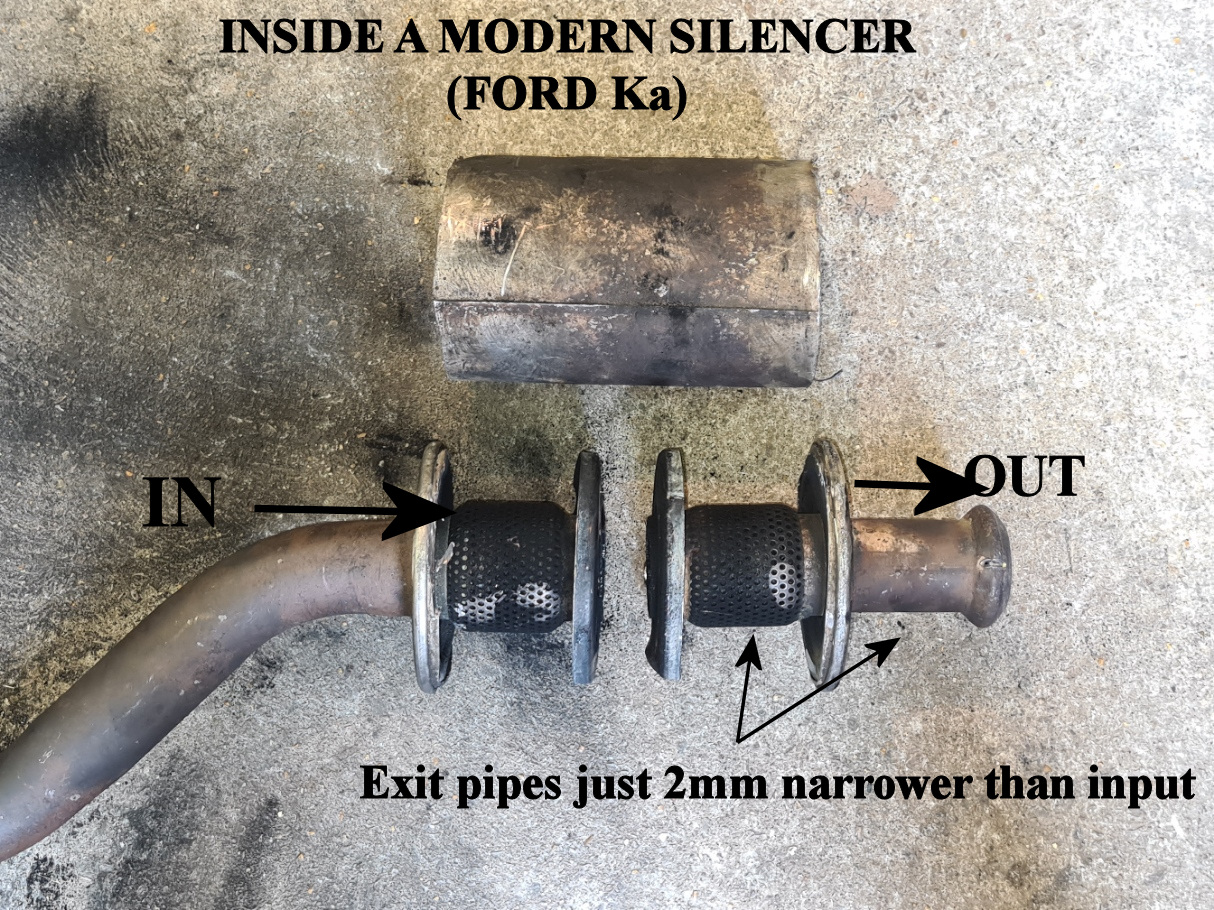
JUST AN ASIDE (OR AN INSIDE TO BE PRECISE.
While I was waiting for delivery of the silencer, I wondered how a silencer
worked so I cut my old one up! But then, of course, the little grey cells
wonderered how had things changed and what was inside a modern silencer.
So I bought one at a scrap yard and - yes, cut that one up too. As you can
see, and much to my surprise, little has changed in over 90 years. There
are still two baffles and two pipes with holes in. The only differences being
the holes in 1933 are along the pipes and in 2026 they are wrapped around a
collar making a madern silencer much shorter and the pipes are not off-set in
the later one.